




Set distance rates
Set Distance Rates
Distance rates determine how much members are reimbursed for distance-based travel. Workspace admins can create multiple rates, control when each applies, configure the associated taxes, and automatically update rates when supported governments publish new ones.
Who can set distance rates
Workspace admins can configure distance rates for a workspace.
Automatic updates are available for Control workspaces with a default currency of USD, CAD, GBP, or AUD.
How to enable Distance rates for a workspace
- In the navigation tabs (on the left on web, and at the bottom on mobile), go to Workspaces > [workspace name].
- Select More features.
- Toggle Distance rates to enable the setting.
Once enabled, Distance rates will appear in the workspace menu.
How to add distance rates
- In the navigation tabs (on the left on web, on the bottom on mobile), select Workspaces > [workspace name].
- Select Distance rates.
- Select Add rate.
- Enter the display name and rate value (e.g., $0.585 per mile or km).
- (Optional) Set a Start date and End date to define the period the rate applies to. Leave these blank if the rate has no time limit.
- Click Save.
When a rate has a Start date or End date, Expensify automatically applies the correct rate based on the expense date. See How Expensify selects a rate when multiple rates exist below.
How to track tax on distance rates
To track taxes on distance rates, Taxes must be enabled on the workspace.Learn how to track taxes.
To enable Track tax for distance rates:
- In the navigation tabs (on the left on web, on the bottom on mobile), select Workspaces > [workspace name].
- Select Distance rates.
- Select Settings.
- Enable Track tax
Once Track tax is enabled, you can assign a tax rate and tax reclaimable amount to an existing distance rate. The selected tax rate is automatically applied when the distance rate is used.
Note: You can’t assign a tax rate when creating a distance rate. Create the distance rate first, then edit it to configure the tax rate and tax reclaimable amount.
How to change a distance rate, effective dates, or tax rate
- In the navigation tabs (on the left on web, on the bottom on mobile), select Workspaces > [workspace name].
- Select Distance rates.
- Select the rate you want to edit.
- Update any of the available settings:
- Name
- Rate
- Start date
- End date
- Tax rate (if enabled)
- Tax reclaimable (if enabled)
- Select Save.
How to disable or delete distance rates
To prevent members from using a distance rate, you can either disable it or delete it.
- Disabled rates remain in the workspace but cannot be selected on new distance expenses.
- Deleted rates are permanently removed.
- In the navigation tabs (on the left on web, on the bottom on mobile), select Workspaces > [workspace name].
- Select Distance rates.
- Select each rate you want to disable or delete.
- Choose Selected.
- Choose Disable rates or Delete rates.
How to automatically update distance rates when government rates change
Expensify can automatically update distance rates in your workspace when the standard government reimbursement rate changes, such as the IRS standard mileage rate in the United States or equivalent rates in supported countries.
When Auto-update government rates is enabled, Expensify adds a new effective-dated distance rate when a supported government publishes a new rate. This means admins don’t need to manually update the standard rate each time it changes.
Expensify uses the workspace default currency to determine which government publishes the rate: USD for the United States, CAD for Canada, GBP for Great Britain, and AUD for Australia.
To enable automatic updates:
- In the navigation tabs (on the left on web, on the bottom on mobile), select Workspaces > [workspace name].
- Select Distance rates.
- Select Settings.
- Enable Auto-update government rates.
What happens when Expensify automatically updates a distance rate
When Auto-update government rates is enabled and a new supported government rate takes effect:
- Expensify adds a new rate with a Start date matching the date the new rate takes effect.
- Previous rates remain available so historical expenses can retain the rate that applied on their expense date.
- If the previous government rate does not have an End date, Expensify sets its End date to the day before the new rate takes effect.
Workspace admins can still edit or disable an automatically added rate.
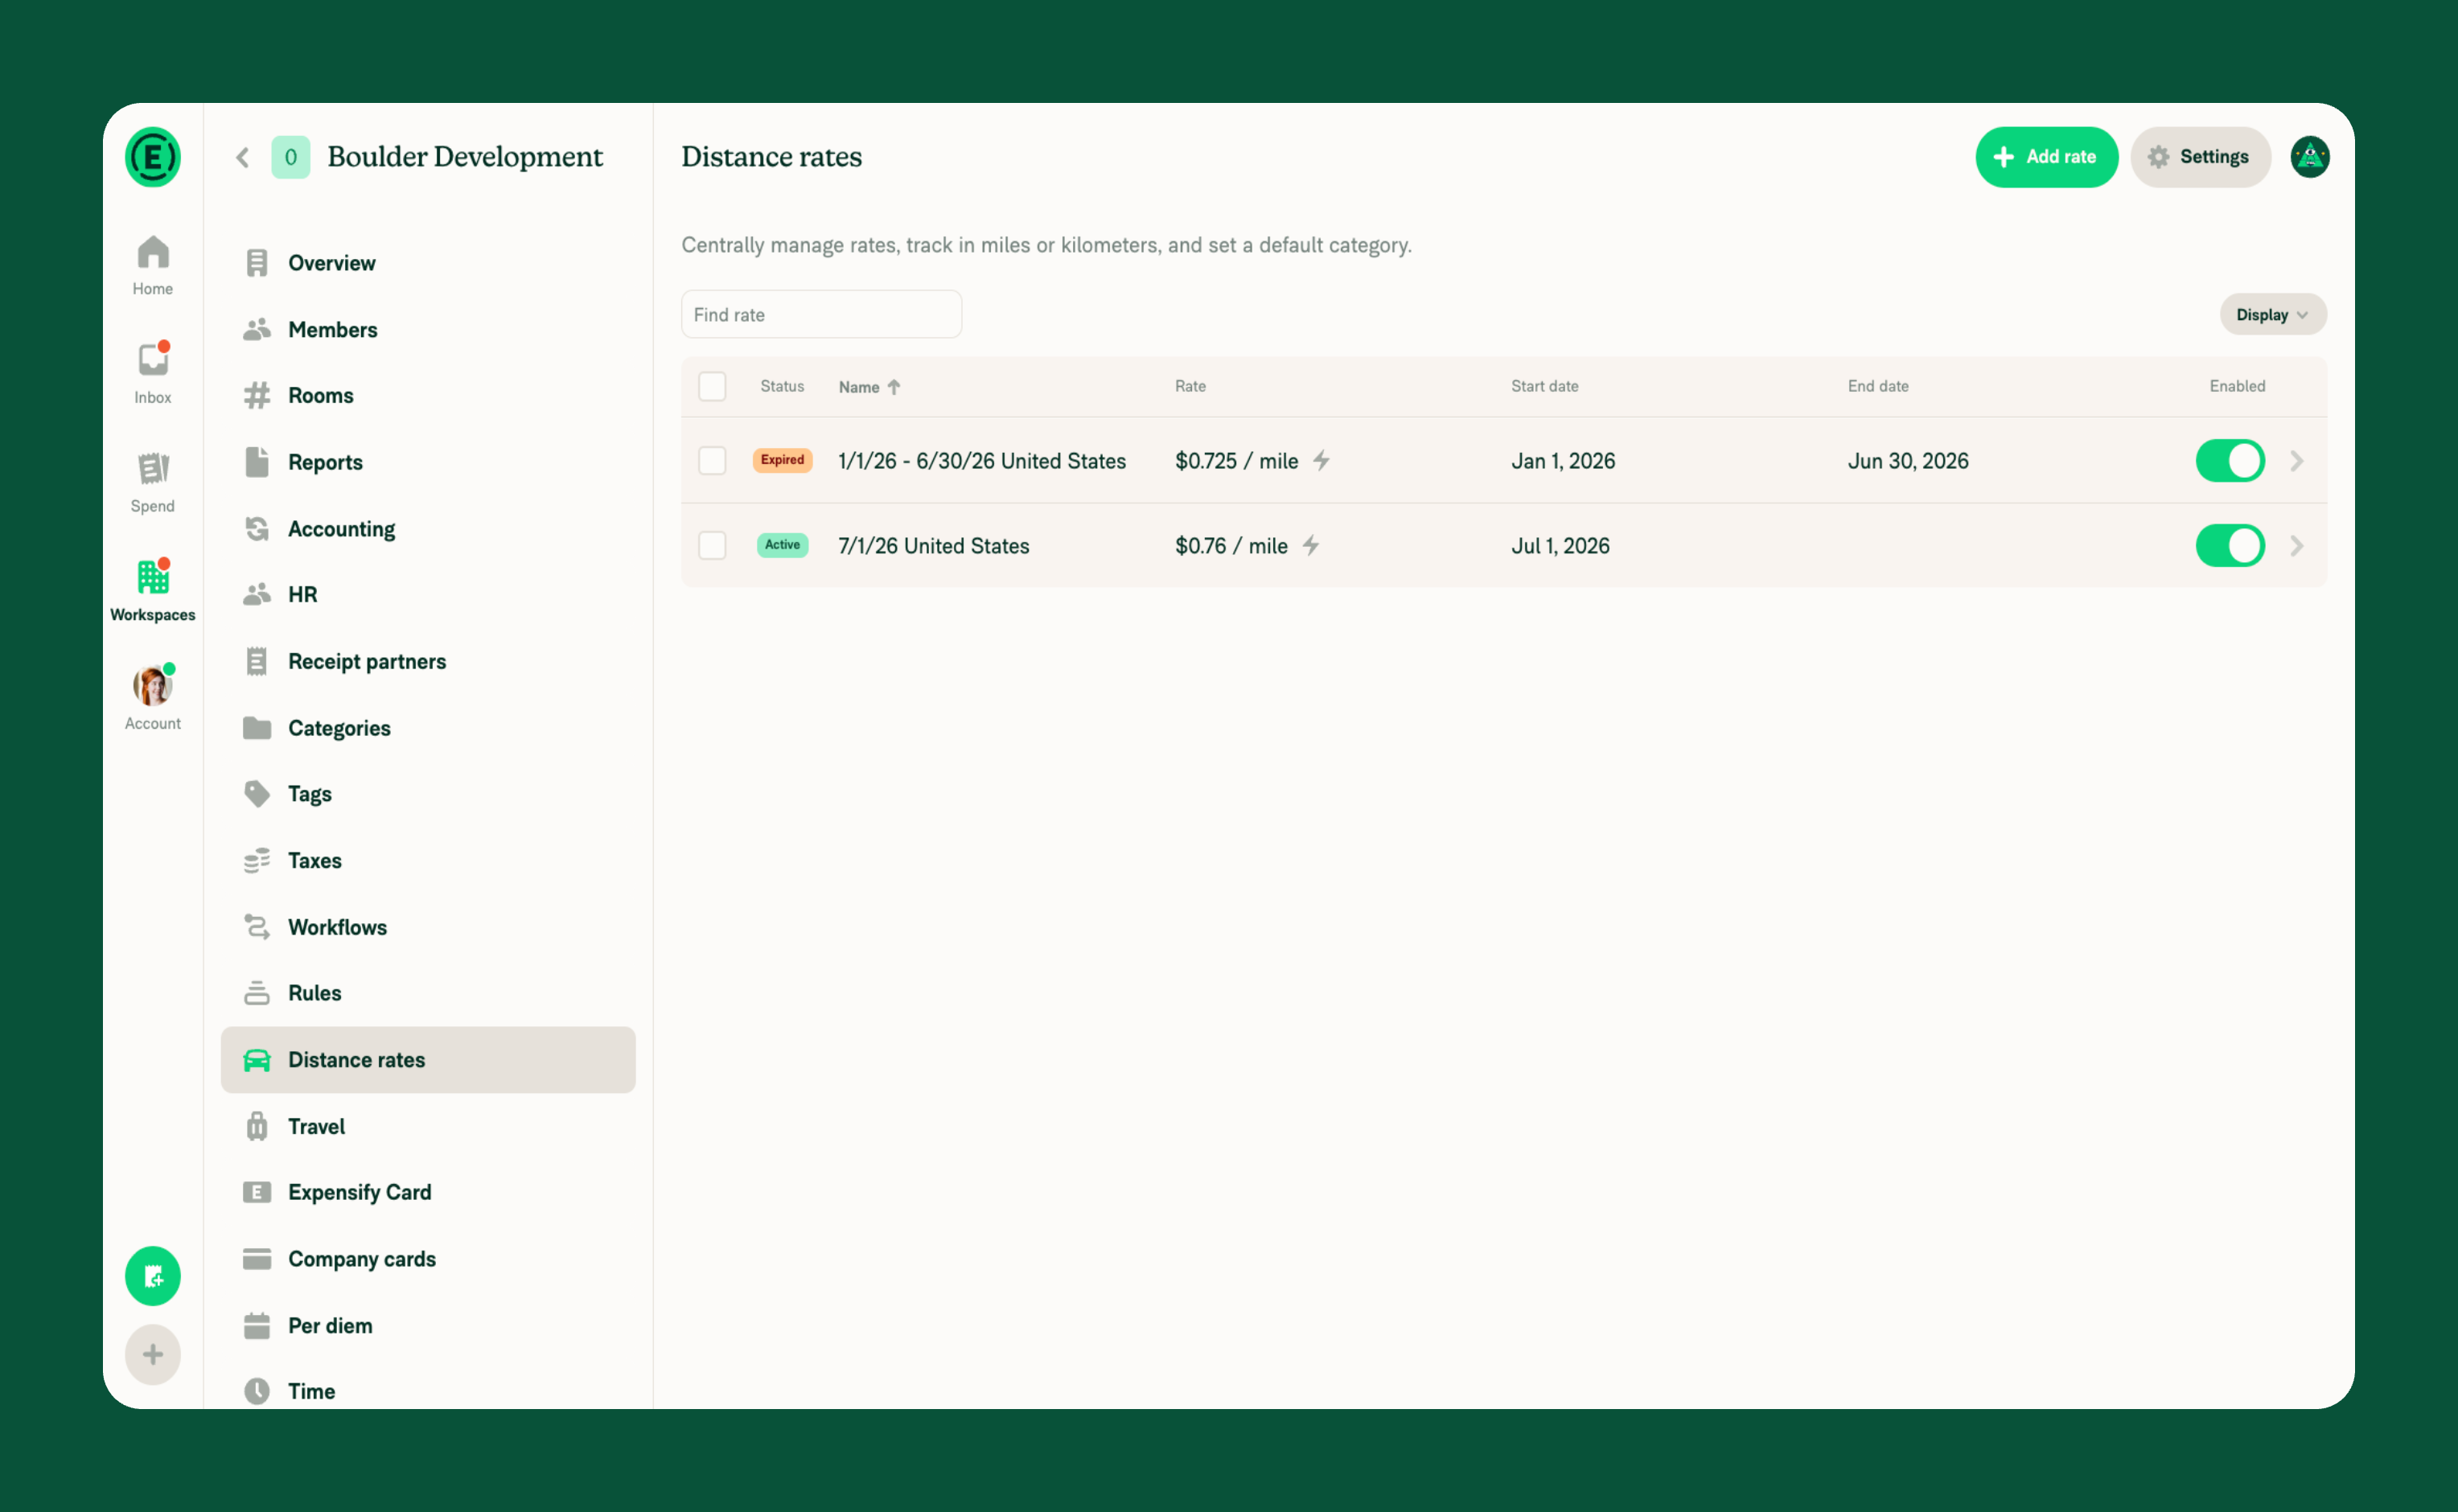
How to tell which distance rates Expensify created automatically
On the Distance rates page, a rate that Expensify created from a published government rate shows a lightning bolt icon next to its amount. Hovering the icon shows the message This rate is auto-generated.
A rate keeps the lightning bolt icon only while its amount, Start date, and End date still match the government rate it was created from. When a workspace admin edits any of those three values, the rate is no longer an unchanged copy of the government rate and the lightning bolt icon is removed.
Changes Expensify makes on its own, such as converting a rate between Miles and Kilometers, do not count as an edit. Those rates keep the lightning bolt icon.
What happens to distance rates when you change the workspace default currency
Expensify determines the publishing government from the workspace default currency, so changing the default currency changes which government rate applies. When Auto-update government rates is enabled and you change the default currency to another supported currency:
- Expensify adds a new government rate for the new currency’s country, with the lightning bolt icon.
- Expensify sets the workspace Unit to the unit that country publishes in: Miles for the United States and Great Britain, and Kilometers for Canada and Australia.
- Government rates created before the change remain in the workspace, converted to the new Unit so every rate is shown in the same unit.
- Those earlier rates keep the lightning bolt icon, because converting a rate to a different unit is not a manual edit. Rates that an admin edited stay without the icon.
How Expensify selects a distance rate based on the expense date
When a workspace has more than one distance rate, Expensify uses effective dates to determine which rate applies to an expense. This allows a workspace to keep multiple rates active, such as a previous year’s rate and a new rate.
- When a member creates a distance expense, Expensify selects the rate whose Start date and End date include the expense date, using the most narrow and most recent date range if multiple apply,
- If a member manually selects a rate that isn’t valid for the expense date, the expense shows a violation indicating that the rate doesn’t match the selected date.
- Setting effective dates is optional. Rates without a Start date or End date continue to apply without an effective-date restriction.
FAQ
Can I create multiple distance rates?
Yes. A workspace can have multiple active distance rates. Members can select from the available rates when creating a distance expense.
Can I disable a distance rate without deleting it?
Yes. Disabled distance rates remain in the workspace but cannot be selected on new distance expenses. You can re-enable the rate at any time.
Can I apply taxes to distance rates?
Yes. Taxes must be enabled on the workspace, and Track tax must be enabled for Distance rates. You can then edit an existing distance rate to assign a tax rate and tax reclaimable amount. The selected tax rate is automatically applied when the distance rate is used.
What does Tax reclaimable mean for a distance rate?
Tax reclaimable represents the portion of the distance rate that can be reclaimed as tax. It is entered as a fixed monetary value for the distance rate.
What happens if I delete a distance rate?
Deleted distance rates are permanently removed from the workspace and cannot be restored. If you want to prevent members from using a rate without removing it permanently, disable the rate instead.
Can I change the reimbursement rate for existing distance expenses?
No. Updating a distance rate only affects future distance expenses. Existing expenses keep the rate that was applied when the expense was created.
Do I need at least one distance rate?
Yes. When Distance rates is enabled, the workspace must always have at least one active distance rate.
Why isn’t Auto-update government rates turned on for my workspace?
Auto-update government rates is turned on by default only for new workspaces. Existing workspaces are opted out by default, so you’ll need to turn it on manually. It’s also only available for workspaces with a default currency of USD, CAD, GBP, or AUD.
Why did the lightning bolt icon disappear from one of my distance rates?
The lightning bolt icon means the rate still matches the government rate it was created from. It’s removed once a workspace admin changes the rate amount, Start date, or End date. A rate that Expensify converted between Miles and Kilometers on its own keeps the icon.
Why did my workspace switch between Miles and Kilometers?
When Auto-update government rates is enabled, Expensify sets the workspace Unit to the unit used by the government that publishes rates for your default currency. Changing the workspace default currency can therefore change the Unit. Existing rates are converted so they’re all shown in the same unit.
Can I keep government rates for more than one country?
Yes. Government rates added before you changed the workspace default currency remain in the workspace and can still be selected on distance expenses. All rates are shown in the workspace’s current Unit.


